How to Set Up Camp Monster Hunter Wilds: Step-by-Step
Wondering how to set up camp monster hunter wilds without wasting time, supplies, or a perfect hunting window?
They can set up a camp fast once they know the exact menu path, placement rules, and what resources actually matter. This guide walks them through choosing a safe location, deploying the right camp type, and confirming it’s usable for restocking, healing, and fast travel.
Look, a good camp isn’t “nice to have.” It’s a control point that reduces cart risk and keeps pressure on the target. They’ll learn how to avoid common placement mistakes and how to plan camp coverage for long hunts.
- Prerequisites: what to unlock, carry, and check before placing anything
- Placement: terrain, threat zones, and distance rules that decide success or failure
- Optimization: when to relocate, how to chain camps, and what to do if a camp won’t deploy
Example: during a Doshaguma pursuit, they can drop a camp near a mid-route chokepoint, restock traps and potions after the first engagement, then fast travel back to rejoin the chase before the monster changes zones.
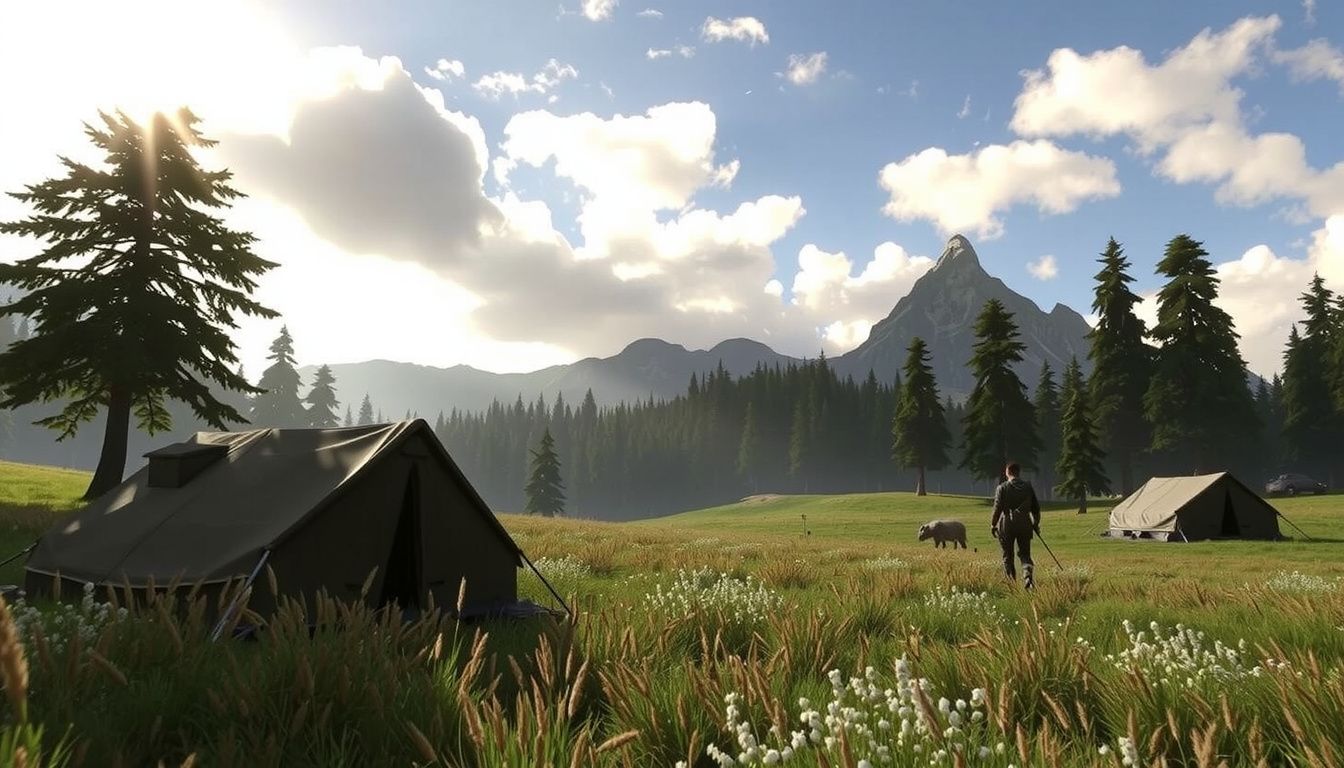
Understand Camp Basics and What It Enables
Now that the groundwork’s clear, they should treat a camp as a field hub, not decoration. A well-placed camp reduces travel time, stabilizes resource flow, and keeps hunts moving when the weather or a monster’s route shifts.
Camps typically enable core loop actions that matter mid-hunt. If the game restricts certain features by difficulty or story progress, they should still plan around the baseline benefits because those don’t change: proximity and safety.
- Fast travel anchor for quicker returns to a target zone
- Loadout control (restock, swap items, adjust tools when allowed)
- Recovery window to reset after a cart or a rough exchange
- Route planning to intercept roaming monsters and avoid hazards
Look at camps as coverage points. One camp near water or cliffs can shorten gathering loops, while another near a monster’s common patrol line can cut chase time by minutes.
Practical example: if they’re tracking a fast mover that frequently rotates between two biomes, placing a camp at the “bridge” zone lets them warp in, grab a quick resupply, and re-engage before the trail goes cold.
Before You Start: Unlock Requirements, Materials, and Map Prep
Before they place anything, they should confirm the camp feature is actually unlocked for that region. Many Monster Hunter systems gate camp placement behind early assignments, region surveys, or a short NPC request chain.
Next, they should prepare materials and inventory space. Even when a camp uses a simple kit, forgetting one component forces a return trip and costs a full monster phase.
- Unlock check: story/quest milestone, region access, NPC permission
- Build inputs: camp kit parts, basic crafting mats, spare tools
- Support items: rations, healing, traps, and one utility option
Map prep matters more than people expect. They should reveal key paths, note environmental threats, and identify “quiet” pockets away from frequent large-monster collisions.
Practical example: if they plan to hunt in a storm-prone area, they can scout a sheltered alcove near a main traversal route, mark nearby gathering nodes, then return with the kit to place the camp where visibility and approach angles stay reliable.
Choose a Safe Camp Location Using Terrain and Threat Cues
Now that they’ve prepped the essentials, the next win comes from placing the camp where it survives. A “good” location isn’t just convenient; it’s one that stays quiet under pressure and keeps travel time low.
They should start by reading the terrain. Natural barriers reduce surprise aggro and give cleaner exits when a hunt turns messy. Open flats look tempting, but they expose the camp to patrol paths and line-of-sight pulls.

- Back the camp against a wall or large rock to cut approach angles.
- Favor slight elevation for visibility and faster disengage routes.
- Use narrow choke points nearby for controlled escapes, not for building inside them.
- Avoid water edges if local monsters patrol shorelines or if footing slows sprints.
Threat cues matter as much as geography. They should watch for frequent small-monster spawns, fresh tracks, and repeated roar audio lines that signal nearby routes. If the area has regular storms or sand gusts, they should avoid ridgelines that force constant stamina drains.
Practical example: if they’re hunting near a canyon route where a large monster loops every few minutes, they should place camp behind a boulder cluster one zone off the loop, then approach the canyon from the side. That keeps the camp intact while still cutting the run back to the target.
Place the Camp Kit and Confirm the Build Zone
Once they’ve picked a defensible spot, they should place the kit with intent. The goal is a valid build zone with clean access, not a “barely works” placement that traps them in awkward geometry.
They should equip the camp kit, then sweep the camera around the ground to confirm a stable surface. If the placement indicator flickers, the slope is too steep or the area is clipping into roots, rubble, or ledges.
- Stand where they want the entrance to face, then rotate the kit so exits point toward the safest route.
- Confirm there’s a short, unobstructed path from the camp to a sprint line—no tight turns.
- Check overhead clearance; low branches and rock overhangs can block interaction prompts.
- Finalize placement only after verifying nearby patrols aren’t crossing the build zone.
They should treat the build zone as a small operating footprint. If the camp spawns them facing a cliff or forcing a hop down, they’ll lose seconds every return trip and risk getting tagged on exit.
Pro tip: after placing, they should run a quick “loop test” from camp to the nearest landmark and back. If they snag on terrain once, they should reposition immediately. A common mistake is building too close to gather nodes, which can pull wandering monsters into the camp area.
Configure Camp Functions: Resting, Cooking, and Item Management
Now that the camp is placed, they should treat it like a loadout console, not a scenic checkpoint. A tight routine here saves minutes per hunt and prevents mid-fight shortages.
First, they should set a predictable rest cadence. Resting is best used to stabilize conditions before committing to a long track, not after resources are already drained.
- Rest when stamina management has been sloppy or the team’s consumables are desynced.
- Cook right before departure so buffs cover scouting, tracking, and first contact.
- Manage items immediately after returning, while the last hunt’s gaps are obvious.
For cooking, they should prioritize meals that match the next objective. If the plan is a high-mobility chase, they should favor stamina-friendly options; if it’s a bruiser monster, they should bias toward survivability.
Item management should follow a simple rule: refill, then specialize. They should restock core healing and utility, then swap in niche tools based on the target’s behavior.
Practical example: after a muddy-area hunt that burned through Cleanser and traps, they return to camp, restock those two items first, cook for stamina, then swap one bomb slot for an extra trap before re-engaging.
Set Up Fast Travel and Route Planning From Camp
Look, a camp only pays off if they move from it efficiently. They should set fast travel habits and a repeatable route plan that reduces dead running and avoids known threat lanes.
They should start by marking two anchors: the camp itself and the most likely contact zone for the target. From there, they can build a short loop that hits gathering nodes and sightlines without committing to narrow choke points.
- Fast travel back to camp to reset supplies instead of limping to the next zone under pressure.
- Route plan using terrain: ridges for visibility, open flats for mounts, cover for healing windows.
- Fallback path that avoids large monster patrol corridors when retreating.
They should also plan for timing. If the monster tends to relocate after an enrage, they should pre-select the next likely zone and travel early, not after the trail goes cold.

Practical example: when a target rotates between a canyon and a watering hole, they fast travel to camp, exit along the ridge for quick scouting, grab one stamina node en route, then drop into the watering hole approach with a clear escape line back to camp.
Reinforce Camp Safety: Traps, Visibility, and Monster Avoidance
Now that the camp’s running as a reliable hub, they should harden it against surprise aggro and patrol routes. Safety comes from three controllables: trap coverage, clean sightlines, and disciplined movement around the perimeter.
They should start by creating a “quiet ring” around the camp. Clear small obstacles that block vision, then face the tent opening toward the most open lane so they can spot threats early. If the area has tall grass or tight rock gaps, they should treat those as ambush funnels and avoid standing there while managing items.
Next, they should deploy deterrents that buy seconds, not hero moments. A simple layout works best:
- Place a trap on the most direct approach line from the monster’s likely patrol path.
- Keep a second trap or status tool in reserve for the retreat route, not the entrance.
- Use noise and light discipline: avoid flashy actions if a monster is already nearby.
Pro tip: they should do a quick 10-second scan before cooking or crafting—look for tracks, roars, and moving shadows. Common mistake: stacking traps at the tent door, which wastes coverage and can trigger panic collisions.
Example: if a brute wyvern keeps cutting through a canyon camp, they should shift the trap line to the canyon mouth, then use the camp’s open side as an escape lane. That keeps the camp usable without forcing a full relocation.
Troubleshoot Common Camp Setup Problems and Fixes
Look, even a well-placed camp can fail under real hunt pressure. When something feels “off,” they should diagnose it fast, fix one variable, then re-test on the next loop through the area.
If the camp is getting attacked too often, the cause is usually proximity to a patrol node or a noisy approach route. They should relocate a short distance to break line-of-travel, then reorient the entrance toward open ground. If relocation isn’t possible, they should reduce time spent in menus and stage supplies for quick exits.
When the game won’t allow placement, it’s typically a zone constraint or terrain conflict. They should try these fixes in order:
- Move to flatter ground and avoid slopes, roots, and loose rubble.
- Step away from cliffs, water edges, and narrow chokepoints.
- Rotate position to find a valid build zone boundary.
If fast travel feels unsafe, the issue is arrival exposure. They should set a “landing routine”: arrive, turn toward the widest lane, sprint two steps, then reassess before opening inventory. Common mistake: traveling in while low on stamina, then getting pinned.
Example: after repeated ambushes on arrival, they can time travel for quieter windows, then place a trap on the most common approach line. That turns a frustrating loop into a controlled reset point.
Start Here
Now that the basics are handled, how to set up camp monster hunter wilds becomes a repeatable loop they can run in every new region. The goal is simple: keep the camp dependable, quick to use, and ready for the next hunt without slowing momentum. A well-run camp should feel like a pit stop, not a project.
Before they leave camp, they should do one last pass that keeps runs clean and consistent:
- Save and restock so the next cart doesn’t cascade into a failed quest.
- Confirm loadouts (items, ammo/coatings, tools) match the target monster.
- Set a single objective for the next outing: track, break a part, or capture.
Example: after a faint to a roaming brute, they reset at camp, swap to a safer mantle/tool set, eat for defense, and head back with a capture plan instead of forcing another risky kill attempt.
Next step: they should run one short hunt using this checklist, then refine it into a personal pre-departure routine.