How To Start A BBQ Fire With Charcoal And Firelighters Fast
how to start a bbq fire with charcoal and firelighters can feel deceptively simple—until the coals refuse to catch and guests start hovering near the empty grill. They’ve set the table, someone’s brought burgers, and the clock’s ticking while thin smoke drifts away with no real heat behind it.
This guide shows a reliable, repeatable way to build a steady bed of embers using how to start a bbq fire with charcoal and firelighters as the core method. It focuses on airflow, safe placement, and timing so the barbecue reaches cooking temperature without constant relighting or wasted fuel.
Look at a practical example: they’re using a kettle grill on a breezy patio. Two natural firelighters go under a small mound of lump charcoal, the vents stay open, and the lid stays off for the first 10 minutes. Once the top coals ash over, they spread the heat zone and start cooking.
They’ll learn how to:
- Choose the right charcoal and firelighter type for consistent ignition
- Arrange coals for fast lighting and even heat
- Control airflow to prevent smoldering and flare-ups
- Know when the coals are ready for food
Understand How Charcoal and Firelighters Work Together
Now the basics need to click: charcoal is the fuel, and firelighters are the controlled ignition source. Charcoal doesn’t “light” like paper; it heats, off-gasses, then sustains combustion once enough pieces are glowing.
Firelighters create a steady flame long enough to warm multiple briquettes or lump pieces at once. That sustained heat is what pushes charcoal past the stubborn start-up phase and into a self-feeding burn.
Charcoal type changes the timing. Lump charcoal lights faster and burns hotter, while briquettes burn longer but usually need more initial heat. Either way, the goal is the same: build a small, reliable ignition zone that spreads.
- Heat transfer: firelighter flame warms adjacent charcoal until it begins to glow.
- Airflow: oxygen feeds the early burn; packed charcoal smothers it.
- Surface area: smaller pieces catch quicker; large chunks need more time.
Practical example: on a cool, windy patio, they can place two firelighters under a loose “teepee” of lump charcoal. Within 8–10 minutes, the first pieces glow, and the heat spreads outward without constant relighting.
Pro tip: use firelighters designed for cooking. Common mistake: burying the lighter under a tight pile, which starves the flame and leads to half-lit coals.
Gather the Right Gear and Choose a Safe BBQ Location
Before any flame, they should set up for control and safety. A clean, stable workspace prevents rushed decisions once the fire is going.
They’ll need a few essentials, and each has a job. Missing one item often leads to unsafe improvising, like moving a hot grill or fanning flames with cardboard.
- Charcoal (lump or briquettes) and firelighters (odorless, food-safe).
- Long matches or a long-nose lighter.
- Heatproof gloves and BBQ tongs.
- Chimney starter (optional, speeds lighting and reduces lighter use).
- Metal ash tool and a non-flammable container for cooled ash.
Location matters as much as gear. They should place the BBQ on flat, non-combustible ground, with clear space around it and overhead clearance from branches or awnings.
- Keep at least 2–3 meters from fences, sheds, and dry plants.
- Avoid enclosed areas; smoke and carbon monoxide build up fast.
- Check wind direction so sparks and heat don’t blow toward people.
Common mistake: setting up on a wooden deck without a protective mat. Pro tip: keep a spray bottle of water nearby for flare-ups, not for soaking coals.
Prepare the Grill for Airflow and Clean Heat
Now the setup work starts paying off. Before any flame touches a firelighter, the grill needs a clear path for oxygen and a clean base so the charcoal burns predictably.
First, open every vent fully and remove the cooking grate. If the BBQ has an ash pan or lower tray, empty it completely; old ash blocks airflow and smothers heat. They should also scrape the charcoal grate and bowl to remove greasy buildup that can create bitter smoke.

Use this quick checklist to prep for clean heat:
- Bottom vents open to feed oxygen from below.
- Top vents open to let smoke and heat draw upward.
- Ash cleared from the base and vent holes.
- Charcoal grate seated flat, not warped or clogged.
Pro tip: if the grill is damp, they should wipe standing water and leave the lid open for a minute. Moisture steals heat early and slows ignition.
Common mistake: lighting charcoal with the lid closed from the start. That traps stale smoke and reduces draft, so the firelighters burn out before the coals fully catch.
Practical example: when starting a kettle grill after last weekend’s cook, they’ll often find a thin ash layer covering the lower vents. Clearing it and fully opening vents can cut ignition time by several minutes and reduce that acrid “dirty start” smell.
Build the Charcoal Stack for Reliable Ignition
With airflow sorted, the next job is shaping the fuel so firelighters can do their work. The goal is simple: tight enough for heat transfer, open enough for oxygen to move through.
They should place the firelighters on the charcoal grate first, then build charcoal around and above them. For most grills, a small pyramid or “volcano” stack lights reliably because rising heat stays concentrated at the center.
Follow this sequence for a dependable stack:
- Set 1–2 firelighters on the grate, spaced a few inches apart.
- Arrange a base ring of charcoal around them, leaving small gaps.
- Build upward into a loose pyramid, keeping the center slightly open.
- Light the firelighters, then wait until the outer coals begin to glow.
Pro tip: mix a few smaller charcoal pieces near the firelighters. They catch fast and help larger lumps or briquettes ignite evenly.
Common mistake: piling charcoal too densely or burying firelighters under a solid layer. Starved of oxygen, the firelighters burn cleanly but fail to spread heat through the stack.
Practical example: for a weeknight burger cook, they can stack about two-thirds of a chimney’s worth in a compact pyramid over two firelighters. Once the top coals show grey edges, they’ll spread the bed for even grilling.
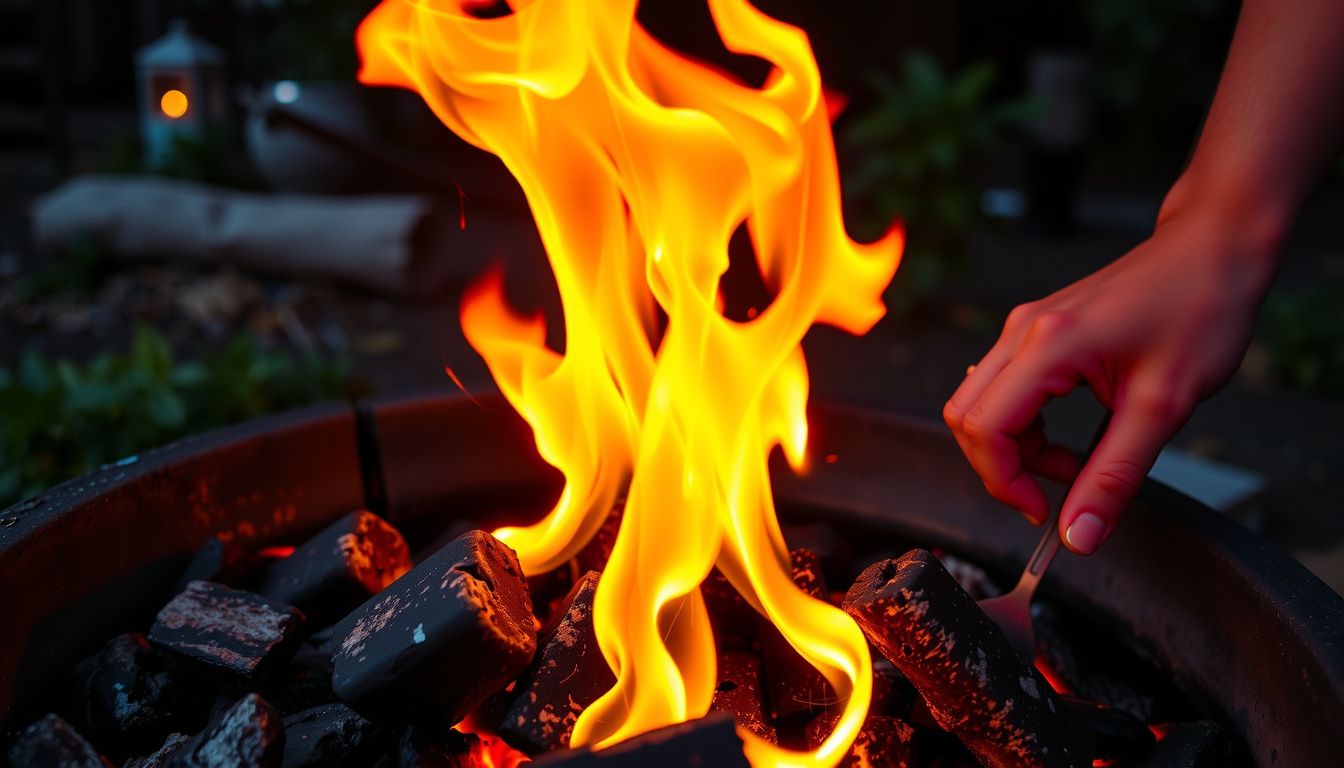
Place and Light Firelighters the Safe Way
Now the stack is built, the ignition needs to be deliberate and controlled. Firelighters work best when they’re placed where flame can climb into the charcoal, not smothered under it.
They should place 1–2 firelighters in the gaps at the base of the stack, evenly spaced. If the stack is large, they can add a third, but only if airflow remains visible through the bottom layer.
- Keep the grill lid fully open while lighting to prevent flare-ups and trapped fumes.
- Light each firelighter on the edge, not the center, so it catches quickly and burns steadily.
- Step back and let it burn; they shouldn’t rearrange coals once the firelighter is lit.
Pro tip: a long-neck BBQ lighter reduces hand exposure and keeps the flame stable in light wind. Common mistake: using lighter fluid “to help” a firelighter; it can create a sudden flash and contaminate food with off-flavors.
Practical example: on a breezy patio, they can shield the lighter with their body, ignite two firelighters on opposite sides of the stack, then avoid leaning over the grill while the flames establish.
Let the Coals Catch and Control Air Vents for Heat
Once the firelighters are burning, patience does more than poking ever will. The goal is a progressive burn: coals ignite from the bottom up, then spread across the stack.

They should watch for visual cues before cooking. Coals are ready when most pieces are coated in pale grey ash, the flames have calmed, and the heat feels strong when a hand is held safely above the grate for a brief moment.
- Bottom vent: primary control for oxygen; open wider for faster, hotter burn.
- Top vent (if present): stabilizes draw; keep partially open to prevent stale smoke.
- Lid position: open for maximum airflow; closed (with vents set) to build steady heat.
Pro tip: if the coals stall, they can gently tap the grill body to drop ash and reopen air paths. Common mistake: closing vents too early, which starves oxygen and leaves black, sooty coals.
Practical example: for burgers, they can open bottom vents fully for 10–15 minutes, then reduce to halfway once the coals ash over, creating stable high heat without constant flare-ups.
Spread the Coals and Set Up Direct vs Indirect Zones
Once the coals are fully ashed over, the fire is stable enough to shape for cooking. They should glow red underneath with a light grey coating on top. If they’re still black in spots, wait a few minutes before moving them.
Use long tongs or a poker to spread the coals into heat zones. Keep the lid open while rearranging to avoid sudden flare-ups. Work slowly; hot briquettes roll easily.
- Create a direct zone by piling coals in a single, even layer where high heat is needed.
- Create an indirect zone by leaving one side with few or no coals for gentler cooking.
- Set a transition strip (thin line of coals) between zones for fine heat control.
Pro tip: For two-zone cooking, stack the direct side slightly higher. That vertical mass holds heat longer and helps sear without chasing temperature.
Common mistake: Spreading coals too thin across the whole grill. It looks tidy, but it kills peak heat and makes it harder to manage doneness.
Practical example: When grilling chicken thighs, they can sear skin-side down over direct heat for 2–3 minutes, then finish on the indirect side with the lid closed. That setup reduces flare-ups from dripping fat and helps the center cook through.
Troubleshoot Common Problems and Extinguish Safely
Even when someone knows how to start a bbq fire with charcoal and firelighters, the cook can still run into heat swings. Most issues come down to airflow, fuel layout, or grease management. Fixes are usually quick once the symptom is clear.
- Fire’s weak or fading: Open vents, knock ash off the grate, and re-stack coals into a tighter pile to concentrate heat.
- Too hot: Partially close vents and spread coals thinner on the hot side; move food to the indirect zone.
- Flare-ups: Slide food away from flames, close the lid briefly, and trim excess fat next time.
Pro tip: If one side runs cooler, rotate the grate or swap food positions instead of constantly chasing vents. Small moves beat constant adjustments.
Common mistake: Spraying water onto flare-ups. It kicks ash onto food and can crack hot enamel; use the lid and repositioning instead.
For shutdown, close all vents and put the lid on to starve the fire of oxygen. Let coals cool completely before handling; then dispose of ash in a metal container. Practical example: If the grill must be stored the same night, they can close vents, wait 30–60 minutes, then confirm the ash is cold to the touch before emptying.
Your Action Plan
Now it’s about repeating a simple routine until it’s second nature. How to start a bbq fire with charcoal and firelighters comes down to consistency: keep the process calm, watch the fire’s behavior, and adjust only when the coals tell you to.
They should run this quick checklist each time:
- Confirm readiness: coals are evenly ashed and heat feels steady at grill level.
- Match heat to food: choose a hotter zone for searing and a calmer zone for thicker cuts.
- Cook with control: preheat the grate, keep the lid strategy consistent, and avoid constant poking.
- Finish clean: let the grill cool, then store leftover charcoal only when fully cold.
Example: if they’re grilling burgers and corn for six people, they can sear burgers over the hotter side, then shift them to the cooler side while the corn cooks through without scorching.
Next step: they should run a short “practice cook” this week and note what vent settings and coal amounts worked best.