How to Install an Awning on a Camper Step-by-Step
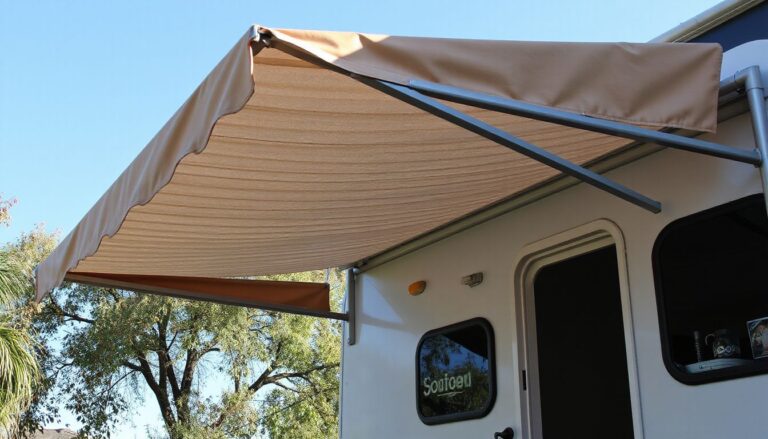
A properly installed awning does more than create shade at a sunny campsite. It keeps rain off the entry door, lowers heat gain against the sidewall, and gives you a dry outdoor space for chairs, cooking gear, and muddy shoes. The process is not difficult, but it is unforgiving. A rail mounted slightly out of level, a bracket anchored only into thin siding, or a skipped sealant bead can lead to binding arms, torn fabric, or water damage behind the wall.
This guide walks through the full installation sequence for most manual and 12V electric RV awnings. The priorities are the same whether you are working on a travel trailer, fifth wheel, truck camper, or a camper with a flat exterior wall: find solid structure, mount the rail straight, hang the awning without twisting the fabric, and seal every penetration.
A common mistake is buying an awning based on the overall trailer length. The correct approach is to measure the usable mounting area, confirm where the arms will land, and check the wall construction before ordering parts.
What You Need to Know Before Buying an Awning
Awning Types and Mounting Systems
Camper awnings fall into a few general categories:
- Manual patio awnings that lift and roll out by hand
- 12V electric awnings with a motorized roller tube
- Cassette awnings that fully enclose the fabric when retracted
- Smaller door or window awnings that cover a single opening
Most travel trailers and fifth wheels use an awning rail mounted to the sidewall. The awning fabric has a bead or cord that slides into the rail channel. Other installations use a bracket track on a flat wall, while some camper vans and truck campers require a roof mount or a rail kit added as part of the installation.
Always treat the awning manufacturer’s installation manual as the controlling reference. Major RV component brands such as Dometic publish model-specific mounting guides that list minimum rail height, required bracket spacing, and torque limits. Manuals vary even between similar-looking awnings, so do not assume one kit installs exactly like another.
Confirm Your Camper Wall Can Support the Load
An awning is not just shade. In a gust, a large awning acts like a sail and transfers significant force through the arms, brackets, fasteners, and wall structure. If the brackets anchor only into thin aluminum skin, fiberglass, or foam core, the mount can tear out.
Check the construction before drilling:
- Aluminum-sided campers may have wood or aluminum framing behind the siding
- Laminated fiberglass walls often have metal backers or aluminum tube framing
- Older campers may have soft spots from previous water damage
- Some manufacturers install awning backing plates at specific locations
Use a deep-scan or metal-sensing stud finder, and confirm your findings from inside the camper by looking at cabinet screws, trim lines, or manufacturer wall diagrams. If you cannot identify the wall structure, contact the camper manufacturer or an RV Industry Association-aligned dealer before cutting or drilling.
In practice, a bracket that hits a void should not be fixed with generic plastic wall anchors. The correct repair is a backing plate, a rivet nut, or a manufacturer-approved reinforcing method.
Measure the Right Size, Not the Trailer Length
The awning fabric length must match the clear mounting rail space, while the arm hardware needs room to fold without hitting doors, windows, lights, or slide-out flanges.
| Measurement | What to Check | Why It Matters |
|---|---|---|
| Usable rail length | Clear extrusion end to end | Fabric and hardware must fit |
| Bracket clearance | Entry door swing, screen door, grab handle | Folded arms must not strike |
| Obstruction line | Porch lights, speakers, gutters, vents | Brackets need clean-wall space |
| Projection | Fully open reach from wall to lead rail | Avoid slide toppers and site obstructions |
| Leg drop zone | Steps, storage doors, propane cover | Support legs need a clear landing area |
A practical example is a travel trailer with 14 feet of clear awning rail but a porch light 6 inches from the rail end. A 13-foot awning may be the better choice because it keeps the arm bracket away from the light wiring area and preserves door clearance. Buying by trailer length alone often forces the installer into a bad bracket location.
Tools, Hardware, and Safety Setup
Staging everything before you lift the awning prevents the most common installation damage. The roller tube is awkward, spring-loaded in some designs, and easy to scratch against the camper if it shifts unexpectedly.
Tools and Consumables
| Category | Items | Notes |
|---|---|---|
| Measuring | Tape measure, 4-foot level or laser level, pencil, painter’s tape | Level the line, do not guess |
| Drilling | Drill/driver, quality bits, step bit, depth-stop tape | Mark drill depth to avoid interior damage |
| Fastening | Stainless screws, bolts, washers, backing plates | Match hardware to wall material |
| Sealing | Butyl tape, non-sag RV sealant, isopropyl alcohol, rags | Clean surfaces before sealing |
| Lifting | Helper, stable ladder, padded sawhorses, wheel chocks | Support the roller tube evenly |
| Safety | Eye protection, cut-resistant gloves, work gloves | Drilling and spring tension both carry risk |
Set the camper on level ground and chock the wheels before climbing a ladder. Never work under an unsupported awning tube, and never remove roller end caps unless you understand how to release spring tension safely.
Step 1: Locate Structure and Mark a Level Reference Line
The first physical step is not drilling. It is establishing a level reference line and confirming where every bracket will land.
Start by cleaning the sidewall with a mild solution and letting it dry. Dirt and wax prevent tape and sealant from bonding.
Mark the line using a camper body seam, roof edge, or another straight reference. Do not measure from the ground unless the camper is on a perfectly level surface. A decal edge is also unreliable because decals can be installed slightly crooked.
Use painter’s tape to protect the siding, then transfer your line onto the tape. A laser level works best, but a 4-foot level checked across the full run is acceptable.
Next, dry-fit the clearances:
- Open the entry door and screen door fully
- Check windows, marker lights, speakers, and exterior outlets
- Confirm the slide topper has room when the slide is open
- Check the support legs will not land on steps or storage doors
- Verify the folded arms will clear the door by at least 1 to 2 inches
Mark the bracket positions, then confirm there is structure behind every hole. A stud finder helps, but also inspect the interior cabinet framing and any trim screw lines. In many campers, those interior screw points line up directly with wall framing.

Mark the level body-line reference and dry-fit bracket clearances before drilling any holes.
A common mistake is centering the awning on the wall without checking the folded-arm position. Another is drilling first and then discovering a bracket lands on a light or a seam.
Step 2: Install the Awning Rail
The awning rail must be straight, cleanly cut, and sealed behind its full contact area. A wavy rail makes the fabric bead bind during deployment and retraction.
Pre-fit the rail along the marked line. If it needs cutting, deburr the cut end so it cannot snag the fabric bead.
Run a continuous bead of butyl tape or RV sealant behind the rail, staying close to the top edge where water will shed. Clamp the rail in place, then drill pilot holes through the rail and into the wall structure.
Fasten the rail using stainless screws driven from the center outward. Working from the center helps prevent waves and bows. Do not overtighten, especially on fiberglass or laminated walls, which can crush or delaminate.
After the rail is secure, tool a top-edge sealant cap over the rail-to-wall seam. This cap should shed water rather than trap it. Do not rely on the hidden butyl tape alone.
Step 3: Mount the Brackets to Solid Backing
Upper arm brackets carry most of the awning load, so they require the strongest mounting points.
Place a small piece of butyl tape behind each bracket footprint. Position the bracket on the marked location, then start the fasteners by hand. If a fastener spins without resistance, you are probably in a void. Stop and relocate or add an approved backing method.
Tighten the hardware in stages. Snug is usually better than maximum torque on thin RV walls. Over-tightening compresses the wall, cracks the sealant, and can make future removal difficult.
After the brackets are mounted, check alignment across their faces with a level or straightedge. Brackets that are not plumb will force the arms to pivot at a slight angle, creating a bind.
Seal all bracket edges and fastener heads with non-sag RV sealant. Water can enter through the smallest gap around a screw head.

Apply a continuous sealant bead along rail and bracket edges to keep water out of the wall.
Step 4: Hang the Awning and Align the Arms
Hanging the awning is a two-person job on most trailer awnings. One person should support the roller tube while the other feeds the fabric bead and starts hardware.
Before lifting:
- Confirm the fabric roll orientation
- Engage the roller lock if equipped
- Pre-position the brackets, bolts, and tools within reach
- Pad the ground or sawhorses in case the tube needs to rest
Slide the awning bead into the rail channel from the end with the most clearance. Walk the awning along the rail evenly, keeping the fabric centered and the bead fully seated. Stop at the bracket locations and loosely attach the top hardware.
Extend the arms partway and pin or clip them so the assembly cannot drop. At mid-open, check symmetry by measuring from each arm to a fixed camper feature such as a window frame or door edge. If one side measures differently, the roller is not centered or an arm is binding.
Set the pitch knobs or cam locks so both arms carry even tension. If the awning has a rain-drain pitch adjustment, set one side slightly lower so water runs off rather than pooling in the fabric.
A common mistake is fully tightening all bracket bolts before aligning the arms. Leave the hardware snug, align the awning at mid-open, then torque to the manufacturer’s spec. Also avoid over-tensioning the roller. Excessive tension accelerates fabric edge wear and makes retraction harsh.
Step 5: Seal Every Penetration
Sealing is not the last cosmetic step. It is the difference between a dry install and slow water damage inside the wall.
Clean every surface with isopropyl alcohol and let it flash off. Use a non-sag RV lap sealant approved for your siding material. Many RV technicians avoid pure household silicone on exterior seams because it is difficult to remove cleanly later and may not bond as well to RV coatings.
Apply sealant over fastener heads and along bracket edges where water can sit. Mask both sides of a seam with painter’s tape, tool the bead smooth, then pull the tape for a clean line.
This is the same water-management issue that makes roof seams fail over time. If the camper already has stains or soft spots, address the water damage at the roof seam before covering the problem with a new awning. Plastic trim and sealant do not stop rot that is already spreading inside.
Check the rail-to-wall seam end to end. Even a 1/8-inch gap at a rail end can let water climb behind the rail during wind-driven rain.
Step 6: Test Operation and Water Intrusion
Before calling the job done, cycle the awning several times. Open it fully, set the pitch, retract it, and watch the fabric tracking.
Spray a light mist along the top rail and bracket tops to simulate rain, then inspect the interior around each fastener. If water appears, remove the fastener, inject sealant into the hole, reinstall it, and re-tool the seam. Sealing over a loose or leaking fastener hides the problem.
| Symptom | Likely Cause | Fix |
|---|---|---|
| Fabric walks to one side | Roller tube off-center | Loosen the mount on the drift side, center, retorque |
| Arms bind or rub | Brackets out of square | Loosen at mid-open, align, tighten evenly |
| Water at one bracket | Poor fastener seal | Remove, inject sealant, reinstall |
| Retraction is harsh | Over-tensioned roller or dry hardware | Check tension and service pivot points |
| Squeak during operation | Dirty or unlubricated pivot | Clean and lubricate only as allowed |
Common Mistakes That Cause Leaks, Binding, or Road Failures
Most failed installs share the same root causes.
- Mounting brackets without confirming the wall structure
- Using fasteners that are too short or too long
- Sealing only the top of the rail and leaving bracket edges exposed
- Fully tightening hardware before aligning the arms
- Measuring from the ground on uneven terrain
- Forgetting to re-check fasteners after the first tow
- Leaving the awning extended in sudden wind
- Skipping surface prep so sealant cannot bond
In practice, the failures that show up soon after installation are usually alignment problems. Long-term failures are almost always water intrusion at a poorly sealed penetration.
Post-Install Checks, Maintenance, and Travel Prep
The first test happens on the road. After your first drive, re-check every fastener. Do the same after the first windy night at camp. Fasteners on a new install can settle or loosen as the sealant compresses.
Always stow the awning fully and engage the travel lock before towing. Even at moderate highway speeds, an unsecured awning can unroll or catch wind.
Keep the fabric clean with mild soap, water, and a soft brush. A garden-hose foam sprayer can make rinsing easier without the risk of pressure-washer damage. Let the fabric dry completely before retracting it for storage.
Before a long trip, include the awning in your normal camper prep. Check the brackets, wipe down the arms, and confirm the awning retracts smoothly. While you are going through the exterior, keep the waste tank clean and make a note of any new wall stains. A good pre-trip routine should also include sanitizing the holding tank so odors do not collect under the shaded outdoor area.
If you are building out a travel setup from the beginning, it also helps to start with a dependable road-trip vehicle that matches your tow requirements and camping style.
When to Call a Professional
A DIY awning install is realistic for many owners, but some campers require professional help.
Call a dealer or RV service shop if:
- The wall is laminated, and you cannot locate solid backing points
- The existing wall shows delamination, soft spots, or rot
- You need to run new 12V wiring through the wall
- The awning is unusually large or heavy
- The mounting location interferes with a slide-out mechanism
- The manufacturer requires dealer installation for warranty coverage
The honest trade-off is that professional installation may cost several hundred dollars, but it reduces the risk of wall damage that can cost far more to repair. If any bracket would land in a void, do not compromise the mount just to finish the job.
Conclusion
A camper awning install succeeds before the first screw goes in. Identify the wall structure, measure the usable rail length, mark a level reference line, anchor every bracket to solid backing, and seal each penetration. Then test the awning through several cycles and re-check the fasteners after the first drive.
Your next step is to dry-fit the rail and brackets without drilling. Confirm each bracket lands on structure, open the entry door to check folded-arm clearance, and photograph the marked locations. If anything misses framing or creates interference, adjust the layout or add proper backing before drilling. That extra 30 minutes prevents most long-term awning failures.
Frequently Asked Questions
Can I install a camper awning by myself?
A small door awning may be manageable alone, but a full patio awning is much safer with two people. One person can support and center the roller tube while the other feeds the fabric bead and starts hardware. Solo installers often scratch the siding or bind the fabric because the assembly shifts during alignment.
Do you need an awning rail to install an awning?
Not always. If your camper does not have a factory awning rail, you can install an aftermarket rail or use a manufacturer bracket kit designed for flat wall mounting. The rail or brackets must still be sealed and anchored to framing, so wall construction matters more than whether a rail already exists.
How long does camper awning installation take?
For a prepared DIYer with a helper, a standard manual or electric patio awning typically takes about three to six hours. That includes measuring, drilling, sealing, lifting, alignment, and testing. First-time installs on laminated walls can take longer if you need backing plates, rivet nuts, or new 12V wiring.
What is the best sealant for a camper awning?
Use a non-sag RV lap sealant or a product specified by your camper and awning manufacturer. Butyl tape works well behind rails and brackets. Avoid household silicone on exterior seams because it can be difficult to remove later and may not bond as reliably to RV siding over time.
How do I find studs in a camper wall?
Use a stud finder with a deep-scan or metal mode, then confirm by checking interior cabinet fasteners, trim screw lines, and manufacturer wall diagrams. A light press on thin aluminum or fiberglass can also reveal a hidden frame member, but never rely on a decal edge or exterior seam alone.
Can an RV awning be installed on a fiberglass camper?
Yes, but location is more critical than on aluminum siding. Fiberglass and laminated walls often have fewer usable studs and may require specific backing plates or rivet nuts. Confirm the wall thickness and framing layout before drilling, and use fasteners and sealants approved for fiberglass.