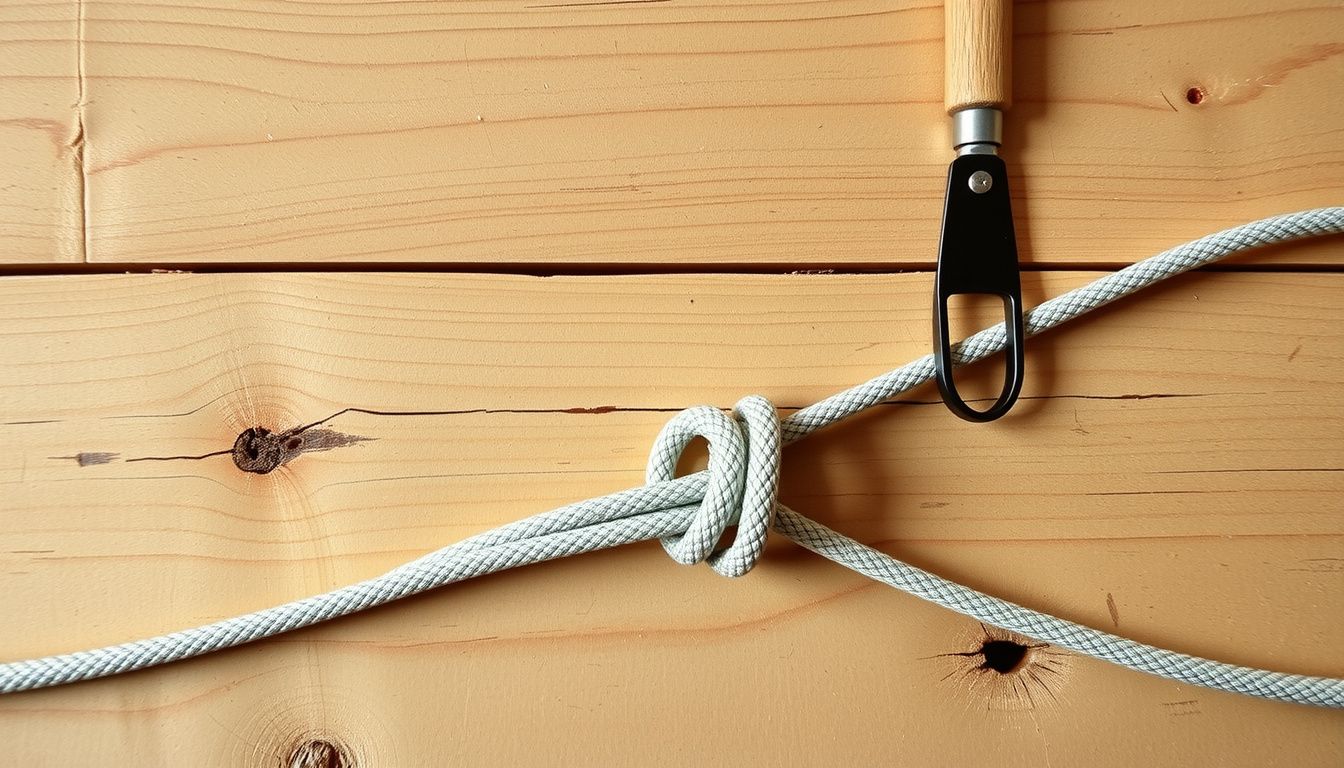
How to Tie a Boat Knot Step-by-Step for Secure Docking
How to tie a boat knot matters the moment a dockhand calls out, the wind shifts, and the boat starts drifting away from the cleat. One loose wrap can turn a calm tie-up into a scramble, especially when hands are wet and the line is stiff.
This guide shows a clean, repeatable way to secure a boat quickly and safely, using a knot that holds under load and releases without a fight. Look, the goal isn’t fancy ropework; it’s dependable control at the dock, on a mooring, or at a trailer ramp.
Here’s a practical example: they pull into a marina slip, loop the dock line over the cleat, and use the same steps every time. The line stays snug through wake and chop, and when it’s time to leave, it comes off with one smooth pull instead of a jammed mess.
They’ll learn how to:
- Choose the right line and length for the tie-up
- Form the wraps in the correct order for maximum holding power
- Finish with a secure lock that still releases cleanly
- Avoid common errors that cause slipping, chafe, or stuck knots
Prepare the Rope and Choose the Right Boat Knot
Now the focus shifts to setup. A clean rope and the right knot choice prevent most docking problems before they start.
They should begin by inspecting the line end-to-end. Frayed cover, flattened sections, or stiff “memory” from old coils can weaken a knot or make it capsize under load.
- Check for damage: glazing, cuts, hard spots, or broken strands.
- Confirm diameter and material: nylon stretches, polyester holds shape, polypropylene floats.
- Match line to hardware: cleat size, piling diameter, and chafe points.
Next, they should prep the working end. If the rope is three-strand, a quick tape wrap or a simple whipping keeps it from unraveling; if it’s braided, heat-seal the end (when appropriate for the fiber) and trim cleanly.
Then they should choose the knot based on the job, not habit. A loop that won’t slip calls for a bowline; a temporary hold on a cleat uses a cleat hitch; joining two lines calls for a sheet bend; controlling a load on a rail benefits from a round turn and two half hitches.
- Need a fixed loop: bowline.
- Need to secure to a cleat: cleat hitch.
- Need to attach to a ring/post: round turn and two half hitches.
Pro tip: They should leave enough tail—at least 6–10 inches for most dock lines—so the knot can be dressed and still keep a safety margin.
Common mistake: choosing a knot that jams under load when they’ll need to untie it quickly. If a line must be released fast, they should avoid over-tightening and always “dress” the knot neatly.
Practical example: when tying off to a mooring ring that’s wet and slightly rusty, they’ll often get better security from a round turn and two half hitches than a single hitch, because the extra wrap increases friction and reduces shock loading on the final turns.

Tie a Bowline Knot Step-by-Step for a Reliable Loop
With the rope prepped and the task clear, they can tie the bowline. It creates a fixed loop that won’t cinch down, making it a go-to for docking, towing, and attaching to a piling.
They should start with the standing part (the long, loaded section) in one hand and the working end (the tail) in the other. Keep the rope untwisted so the knot dresses cleanly.
- Make a small loop in the standing part, leaving enough tail; the standing part should lie on top.
- Pass the working end up through that loop from the underside.
- Wrap the working end around the standing part, going behind it once.
- Bring the working end back down through the original loop.
- Dress and set by pulling the standing part and the loop while holding the knot body; then snug the tail.
Pro tip: They should “dress” the bowline so the collar (the small turn around the standing part) sits snug and aligned. A sloppy collar invites capsizing when the load shifts.
Common mistake: tying a “cowboy bowline” by routing the tail the wrong way around the standing part. It can work, but it’s easier to mis-dress and behaves differently under cyclic loading.
For extra security in vibration or repeated slack-tight cycles, they can add a stopper knot in the tail (like a simple overhand) after the bowline is set. That’s quick insurance when the line may be bumped or unloaded.
Practical example: when securing a dock line to a piling, they can tie a bowline in the bitter end, drop the loop over the piling, and then take the standing part back to the boat’s cleat. The loop stays consistent in size, and the knot is typically easy to untie after a long wait at the dock.
Secure the Line to a Cleat with a Proper Cleat Hitch
Now the line needs to be fixed to the dock hardware, not just looped. A cleat hitch is the standard because it holds under load, resists jerking, and releases without a fight. When done cleanly, it’s the difference between a controlled landing and a boat that “walks” away from the pier.
Before tying, they should confirm the cleat is solid and clear of sharp edges. They should also check the rope’s lead angle so it pulls straight from the boat to the cleat. A bad angle can lever the hitch upward and make it creep.
They can tie a proper cleat hitch in a repeatable sequence:
- Wrap once around the base of the cleat (a full turn) to take the load off the final locking turns.
- Cross over the top to form a figure-eight around the horns, keeping each turn snug and flat.
- Make one more figure-eight so there are at least two top turns for friction.
- Create a small bight and place it over the nearest horn as a locking half-hitch, then pull it tight.
Pro tip: they should “dress” the hitch so the turns sit neatly and don’t stack. A dressed cleat hitch grips better and is easier to inspect at a glance. Another pro move is leaving a short tail—enough to grab, not enough to snag feet.
Common mistakes show up fast. They shouldn’t skip the initial full wrap, because the cleat horns aren’t meant to take raw load alone. They also shouldn’t use granny-style loops or random wraps that jam when wet and loaded.

Practical example: when a crosswind pushes the bow off the dock, a crew member can drop a spring line onto the cleat with a quick full wrap and figure-eight. The load transfers immediately, buying time to adjust fenders and bring the boat parallel without the line slipping.
Test, Troubleshoot, and Untie the Knot Safely
Once it’s tied, they should test it like it matters—because it does. A dock line that looks fine can still slip if the turns aren’t seated or the tail isn’t locked. A quick check prevents a slow drift that turns into a collision.
They can test the cleat hitch in three steps:
- Load it gradually by pulling the standing part in the direction the boat will strain.
- Watch for movement: turns should tighten, not roll over the horn.
- Confirm the tail is secure and the final locking bight stays seated.
If something’s off, they should troubleshoot by symptom. If the hitch creeps, they likely missed the full base wrap or didn’t add enough figure-eight turns. If it jams, they probably over-wrapped or crossed turns so tightly that friction locked everything under load.
Pro tip: if the rope is very stiff or very slick (new double-braid), they can add one extra figure-eight before the locking bight. They should avoid making a bulky “rope ball,” though; bulk hides mistakes and catches toes on the dock.
Common mistakes include tying on a damaged cleat, leading the rope across a sharp edge, or leaving a tail so long it becomes a trip hazard. They should also avoid tying the line to rails or stanchions; those fittings aren’t designed for docking loads.
To untie safely, they should first reduce tension. They can ease the boat forward or aft a few inches, or briefly take strain on another line. Then they should lift off the locking bight, unwind the figure-eight turns in reverse order, and finally remove the base wrap.
Practical example: after a wake hits and the line snaps tight, a crew member shouldn’t yank at the knot. They should take the load with a second line, slack the original, then peel the hitch off cleanly—fast, controlled, and without burned fingers.
Your Action Plan
Now it’s time to turn how to tie a boat knot into muscle memory. They should aim for consistency: the same motions, the same checks, every time the line goes under load. A knot that looks “about right” can still slip when the boat surges.
They can keep the process simple by following this repeatable routine:
- Practice on land for two minutes before each outing.
- Confirm the load path is clean and the knot is dressed neatly.
- Set the knot with a firm pull, then re-check after the first wake.
- Standardize their setup so crew members tie it the same way.
Look at a real dock scenario: a skipper steps off to grab a piling, a gust pushes the bow out, and the line snaps tight. If they’ve tied and set the knot correctly, the boat holds position instead of drifting into a neighboring hull.
Next step: they should tie the knot 10 times in a row without looking, then test it under steady pull and quick tugs.
Related read: How to Shrink Wrap a Boat for Secure Winter Storage


One Comment