How to Shrink Wrap a Boat for Secure Winter Storage
Wondering how to shrink wrap a boat without wasting film, trapping moisture, or ending up with a loose, noisy cover all winter? It can be done cleanly with the right materials, safe heat control, and a simple sequence that keeps the wrap tight, vented, and secure.
The process is straightforward: build a support frame, drape and anchor the film, heat-shrink it evenly, then add vents and access points so the boat can breathe. Done right, shrink wrap protects against UV, snow load, road grime, and wind abrasion while reducing mildew risk.
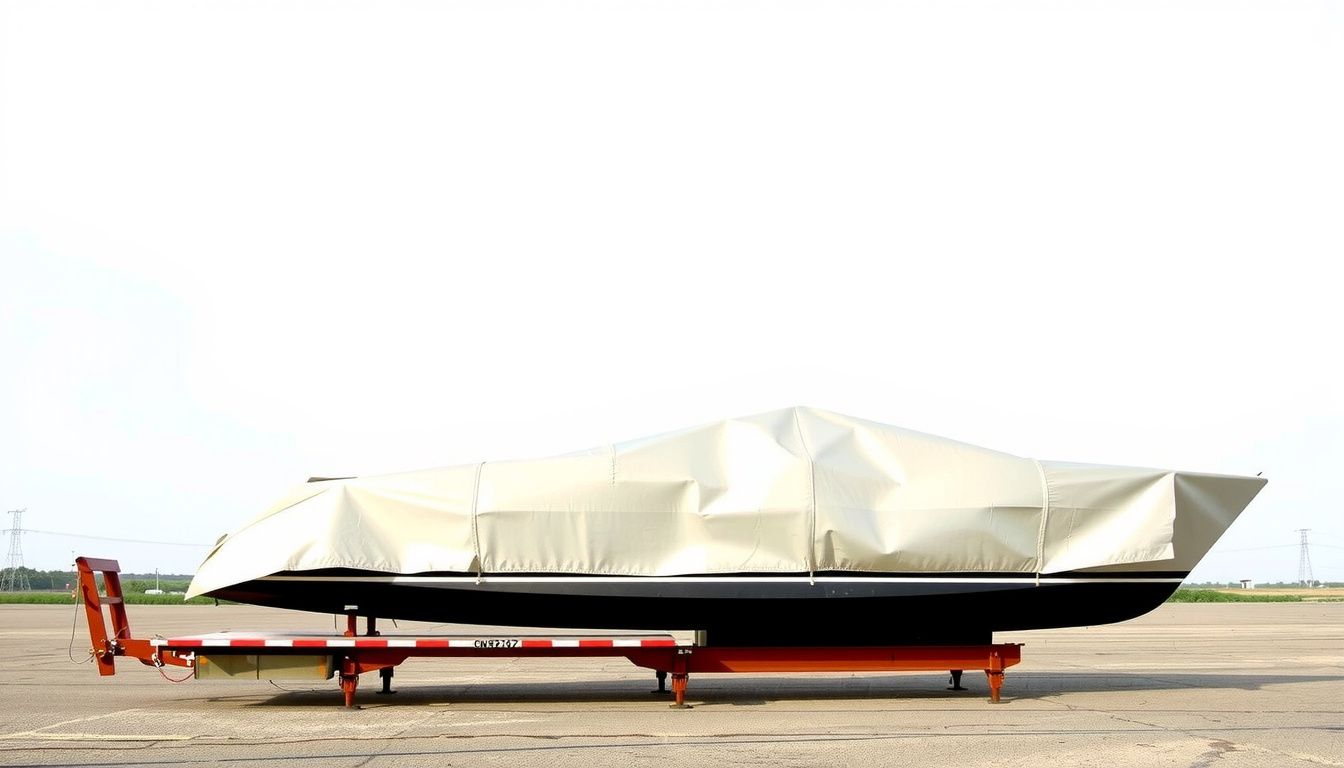
Look, a practical example helps. A 21-foot bowrider stored outdoors typically needs a basic ridge line, a few vertical supports, and vents placed near the highest points; that setup prevents pooling water and keeps the wrap from chafing the windshield and rails.
They’ll learn how to choose materials and execute each phase:
- Film thickness and how it changes for storage vs. transport
- Strapping and perimeter sealing that won’t slip in high winds
- Heat gun technique to avoid burn-through and weak spots
- Venting and door kits for humidity control and easy access
Prepare the Boat and Work Area Before You Start
With the basic approach clear, the next win comes from preparation. A clean hull, a dry interior, and a safe work zone prevent most shrink-wrap failures before the first sheet is unrolled.
They should begin by choosing the right day and location. Wind turns film into a sail, and wet conditions trap moisture. A flat surface with good drainage and room to walk the perimeter matters as much as the wrap itself.
Before any framing starts, they’ll want to stage tools and consumables so the job doesn’t stall mid-wrap. A simple layout keeps heat tools away from fuel, solvents, and clutter.
- Heat source (shrink gun) and fuel, plus a fire extinguisher
- Wrap film, zipper door kit (if needed), and strapping/banding supplies
- Vent covers, tape, gloves, safety glasses, and a stable ladder
- Rags, mild cleaner, and a moisture absorber or desiccant packs
Next, they should clean and dry the boat. Dirt under the film becomes abrasion points, and trapped water can lead to mildew. A quick wash, rinse, and full dry-down—especially in cockpit lockers and bilge areas—pays off later.
They should remove or secure anything that can puncture the film or flap in the wind. Antennas, canvas, loose lines, and sharp-edged accessories are common culprits. If removing an item isn’t practical, it should be padded and marked so it’s not forgotten.
- Remove biminis, eisenglass, cushions, and electronics where possible
- Coil and tie off dock lines, halyards, and shore-power cords
- Close seacocks (as appropriate) and confirm drain plugs are handled correctly
Ventilation planning happens now, not after the wrap is tight. They should decide where vents will go based on cabin volume and local humidity. A common mistake is “one vent is enough,” which often isn’t true for enclosed cabins.
Practical example: A marina crew prepping a 24-foot cuddy cabin in the Pacific Northwest typically wipes down the cabin, leaves interior lockers cracked open, places two moisture absorbers inside, and plans for four vents—two low near the stern corners and two higher forward—to reduce condensation during long rain cycles.
Finally, they should do a safety check before framing. Keep the shrink gun area clear, verify ladder footing, and confirm there’s no overhead obstruction. Look—ten minutes here can prevent a torn wrap or worse, a fire incident.

Build a Support Frame and Add Chafe Protection
Once the boat and site are ready, they can build the structure that gives the wrap its shape. A strong frame prevents pooling water, reduces wind slap, and keeps film off hardware that can puncture it.
They should start by setting a ridge line that runs bow to stern. The ridge should be high enough to shed snow and rain, yet low enough to keep the wrap tight and heat-efficient. For most boats, a noticeable “tent” profile beats a flat roof every time.
Next, they add uprights and cross supports to stop the ridge from sagging. The spacing depends on boat length and exposure to wind or snow load. A common mistake is wide spacing that looks fine on day one but collapses after a few storms.
- Set a centered ridge pole or strap line, secured at strong points
- Add evenly spaced uprights (often every 3–5 feet) to support the ridge
- Use cross ties to prevent racking and side-to-side sway
They should keep the frame clear of the gelcoat and delicate fittings. If uprights must rest near the deck, they should sit on padded bases, not bare ends. Sharp corners and exposed fasteners are non-negotiable hazards and must be covered.
Now they add chafe protection anywhere the film could rub. Even with a good shrink, wind vibration slowly saws through plastic at contact points. They should treat rails, cleats, windshield corners, and antenna bases as high-risk zones.
- Wrap foam or felt around stanchions, rails, and windshield edges
- Use chafe tape on corners, cleats, and frame contact points
- Pad the ridge and any strap junctions where film will tension
They should also plan access and ventilation while framing. If they need winter access, a zipper door location should be framed to stay flat and stable. Vents should align with open interior pathways, not blocked by bulkheads or closed doors.
Practical example: For a 19-foot center console stored in a windy lot, a technician builds a ridge using a strap line tied to the bow eye and transom tie-downs, adds five uprights, then pads the T-top corners with foam and chafe tape. That small padding step typically prevents pinholes that show up after the first week of gusts.
Before film goes on, they should walk the perimeter and do a “snag test” with a rag or glove. If it catches, the wrap will tear there too. Fixing it now is fast; fixing it after shrinking is expensive.
Wrap, Seal, and Install Vents for a Weatherproof Fit
With the frame rigid and chafe points protected, the job shifts to controlling the film. A clean wrap and tight seals stop wind from “drumming” the cover and keep rain from finding a path inside. The goal is a smooth skirt, consistent overlap, and planned ventilation.
They should start by pulling the shrink film over the ridgepole and letting it fall evenly to both sides. The film should be oriented so the factory fold sits on the centerline, which helps it track straight as it’s tensioned. Look for equal overhang at the bow and stern before anything gets locked in.
Next comes the hem and perimeter attachment. They should create a straight hem line around the bottom edge, then run a strap or rope so the film can’t lift while heating later. A common approach is to use belly bands around the hull or cradle and a separate perimeter line near the hem for redundancy.
- Overlap seams at least 6–8 inches, with the overlap facing down-slope so water sheds over the joint.
- Keep the skirt low and even; high “short skirts” invite wind to grab the edge.
- Place access points now (zipper door or slit) so they don’t get added after the film is tight and brittle.
Sealing seams is where weatherproofing is won or lost. They should use shrink-wrap tape or approved seam tape on dry, clean film, pressing firmly to avoid bubbles. Any patch should extend beyond the tear or overlap line by several inches in all directions.

Now ventilation. Without vents, trapped humidity condenses, especially when warm days follow cold nights. They should install vents on both sides to create crossflow, placing them high enough to avoid snow or pooling water but not so high that they sit on the ridge where stress is greatest.
- Use at least two vents for small boats; more for larger cabins or enclosed cockpits.
- Cut the vent opening cleanly, then seat the vent base flat and tape the flange fully.
- Keep vents away from sharp frame corners and high-chafe zones.
Pro tip: They should mark vent locations with a felt marker before cutting, then re-check from ground level for symmetry and clearance. Common mistake: installing vents after shrinking; the film becomes tight and thin, making clean cuts harder and increasing tear risk.
Practical example: a 22-foot center-console stored outdoors in a windy yard often needs four vents—two forward and two aft—to prevent mildew in the console cavity. When the vents are spaced opposite each other and the seams are taped down-slope, the wrap stays quiet and the interior stays noticeably drier through freeze-thaw cycles.
Heat-Shrink the Film and Finish with Safety Checks
Once the film is secured and vented, shrinking turns a loose drape into a rigid shell. The heat gun work should be deliberate, not rushed, because uneven shrinking creates thin spots and stress lines. They’re aiming for a drum-tight finish without scorching.
They should begin by shrinking the top panels first. Working from the ridge down reduces wrinkles before the skirt tightens, and it prevents “locking in” slack at the crown. The operator should keep the gun moving in smooth passes, holding it far enough away to heat the film evenly rather than spot-melting it.
After the top is snug, they should move to the sides and then the ends. The bow and stern take the most wind load, so these areas need careful, even tension. If wrinkles persist, they should re-warm the area and pull the film slightly by hand (with gloves) before finishing the pass.
- Shrink the ridge and upper slopes first.
- Shrink mid-panels, alternating port and starboard to keep tension balanced.
- Finish the skirt and hem last, tightening only enough to remove flutter.
Pro tip: They should watch the film’s sheen—when it turns uniformly glossy and tight, the panel is done. Common mistake: overheating one spot to chase a wrinkle; that thins the film and can cause a tear in the next windstorm.
Now they should reinforce stress points. Corners, strap contact zones, and any sharp transitions deserve extra tape or patching before the wrap is fully cold. If a zipper door is installed, they should heat around it lightly to seat it, avoiding direct heat on the zipper teeth.
Safety checks matter as much as appearance. They should confirm the cover clears antennas, rails, and the highest frame points without cutting in. They should also verify straps are tight, knots are secure, and vents are fully bonded with no lifting edges.
- Walk the perimeter and press all tape edges; re-tape any lifting corners.
- Check for “oil-canning” (large flexing panels) and add a belly band if needed.
- Confirm drainage: the cover should slope so water can’t pool.
Practical example: on a 28-foot cruiser with a tall windshield, a crew might notice a soft panel behind the screen after shrinking. Adding one belly band and re-heating that section in alternating passes typically removes the flex, reducing noise and preventing strap wear during winter gusts.
When the film cools, they should do a final inspection from multiple angles. Any small pinholes should be patched immediately, because wind will enlarge them. A tight, vented, and evenly shrunk wrap is what keeps the boat dry, clean, and ready for spring commissioning.
You’re Ready
Now the job’s about consistency, not guesswork. With how to shrink wrap a boat handled in a repeatable sequence, the cover should sit tight, vent correctly, and stay quiet through wind and weather. The real win is control: clean seams, planned access, and a finished wrap that protects without creating new problems.
Look at it like a final quality pass before winter hits. A marina crew might wrap a 22-foot center console in an afternoon, then do a quick walk-around the next morning after a cold snap to confirm tension stayed even and no edges lifted.
- Document the film size, vent count, and tape locations for next season.
- Label access doors and tie-down points so anyone can open it safely.
- Schedule a mid-season inspection after the first big storm.
Next step: gather the exact materials list and set a calm-weather date, then commit to a single, uninterrupted wrap session from start to final inspection.


One Comment