How to Grill Ribs on Charcoal Fast for Tender Results
Most people think how to grill ribs on charcoal fast means blasting them over raging coals until the outside looks done. That mistake creates tough meat, scorched sugar, and a “done” rack that still fights the bite.
The real answer is controlled heat, smart placement, and a tight timeline. They can cook ribs quickly on charcoal by running a two-zone fire, keeping the lid closed, and finishing with a short, hot glaze. Fast doesn’t mean careless; it means efficient.
A reliable quick-rib approach usually includes:
- Two-zone setup: coals on one side, ribs on the other
- Thin, even racks: St. Louis or baby backs cook faster than thick spares
- Foil-assisted tenderizing: a brief wrap speeds tenderness without drying
- High-heat finish: 5–10 minutes to set sauce and color
Example: When a backyard cook has 90 minutes before guests arrive, they can run the grill around 300–325°F, smoke the ribs indirectly for about 45 minutes, wrap with a splash of apple juice for 25 minutes, then unwrap and glaze over direct heat for 10 minutes. The result is tender ribs with real charcoal flavor, on schedule.
Gather Tools, Fuel, and Ribs Before You Start
Now, the speed comes from preparation, not panic. When they set up the right tools and fuel first, they keep the ribs moving through a controlled, high-efficiency cook instead of stopping to hunt for gear mid-grill.
They should start by staging everything within arm’s reach of the grill. Fast rib cooks rely on frequent lid checks, quick spritzes, and tight heat control, so the setup has to support that rhythm.
Tools they should have ready:
- Charcoal chimney starter and lighter cubes (faster, cleaner ignition than fluid)
- Long tongs and heat-resistant gloves (safe rib rotation and coal adjustments)
- Instant-read thermometer (confirm doneness without overcooking)
- Grill brush and oiled paper towel (clean, nonstick grates)
- Foil pan or drip tray (manages flare-ups and keeps the grill stable)
- Timer and a small spray bottle (water or apple juice) for quick moisture control
For fuel, they’ll get the best “fast” results from a hot, consistent coal bed. A full chimney of briquettes is predictable and holds steady. Lump charcoal ignites faster and burns hotter, but it can vary in size and burn rate.
They should also stage smoke wood carefully. One or two small chunks are enough for a short cook; too much wood can turn ribs bitter fast. Chips work, but they burn quickly and may need replenishing.
Rib selection matters. Baby backs usually finish faster than spare ribs because they’re smaller and leaner. They should buy racks with even thickness end-to-end; thin “shiners” and uneven racks cook unevenly and slow the process.
Practical example: If they’re cooking for a weeknight, they can pick two meaty baby back racks (about 2–2.5 lb each), light one full chimney of briquettes, and stage a thermometer plus a foil pan before the first coal hits the grate. That single setup change often saves 10–15 minutes of fumbling.
Common mistakes: starting with half-lit coals, skipping the thermometer, and realizing too late they’re out of foil or spritz liquid. Those delays cost more time than any “hack.”
Prep the Ribs for Fast, Even Cooking
Look, ribs cook quickly only when they cook evenly. Their prep job is to remove barriers to heat, standardize thickness where possible, and season in a way that supports browning without burning.
They should begin by trimming for uniformity. Excess fat won’t “melt away” in a fast cook; it blocks seasoning and slows heat transfer. They can square off ragged edges that would otherwise overcook and dry out.
Next, they should remove the membrane (silver skin) on the bone side. It tightens during cooking and can prevent seasoning and smoke from penetrating. A butter knife under a bone, then a paper towel grip, makes it quick.
For seasoning, they should keep it simple and balanced. High sugar rubs burn faster over charcoal, especially in a hot zone, so they’re better used later as a finishing layer. Salt and savory spices can go on earlier to build a crust without scorching.
Fast-prep checklist:

- Pat ribs dry so the rub adheres and browns cleanly
- Light trim: remove thick fat caps and loose flaps
- Remove membrane for tenderness and faster bite-through
- Apply a thin binder (mustard or oil) only if needed for adherence
- Use a low-sugar rub now; save sweet sauce for the end
They should also consider portioning. Cutting a full rack into half-racks speeds handling and helps fit a two-zone charcoal setup. It also reduces the time the lid stays open during flips and checks.
Practical example: If they’re using spare ribs but still want speed, they can trim to a St. Louis cut, remove the membrane, then split the rack into two pieces. Those pieces rotate faster between hot and cooler zones, limiting burnt edges while still finishing on time.
Common mistakes: heavy sugar rubs early, wet ribs that steam instead of sear, and skipping membrane removal. Each one leads to slower cooking or uneven texture, which defeats the “fast” goal.
Build a Two-Zone Charcoal Fire for High-Heat Speed
Now the cook can move fast without burning the ribs by building a controlled, two-zone charcoal setup. The goal is simple: one side runs hot for searing, the other stays cooler for finishing. That heat separation is what makes speed possible on charcoal.
They should start with a clean charcoal grate and fully open vents. A wide-open intake and exhaust gets the coals ripping quickly, which matters when time is the constraint. Look for a grill temp that can climb hard, then settle into a predictable range.
They’ll build the fire in a tight pile on one side of the charcoal grate. A compact mound concentrates heat for the initial sear. The opposite side stays empty, creating the indirect zone where the ribs can roast without flare-ups.
-
Light a full chimney (about 3/4 to 1 full, depending on grill size) until the top coals are lightly ashed over.
-
Dump the lit coals on one side and stack them 2–3 coals deep for a hotter “engine.”
-
Add a small handful of unlit charcoal on top to extend high heat for the roast phase.
-
Set the cooking grate on, close the lid for 5 minutes, and stabilize the zones.
For flavor without slowing the cook, they can add one small wood chunk on the hot pile. Chips tend to spike smoke fast and burn out; a chunk gives steadier smoke during the short cook. If the ribs were seasoned with sugar, they should be cautious—sugar can scorch quickly over direct heat.
-
Pro tip: Keep a “cool corner” by leaving 1/3 of the charcoal grate empty; it becomes a safe landing spot during flare-ups.
-
Common mistake: Spreading coals across the entire grill, which removes the indirect zone and forces constant flipping.
-
Common mistake: Closing vents too early; choking airflow slows recovery after the sear.
Practical example: On a 22-inch kettle, they can run a full chimney on the left side, leave the right side bare, and place a small oak chunk on the hot pile. With vents open, the lid thermometer often climbs past 450°F quickly, while the indirect side stays notably gentler for finishing.
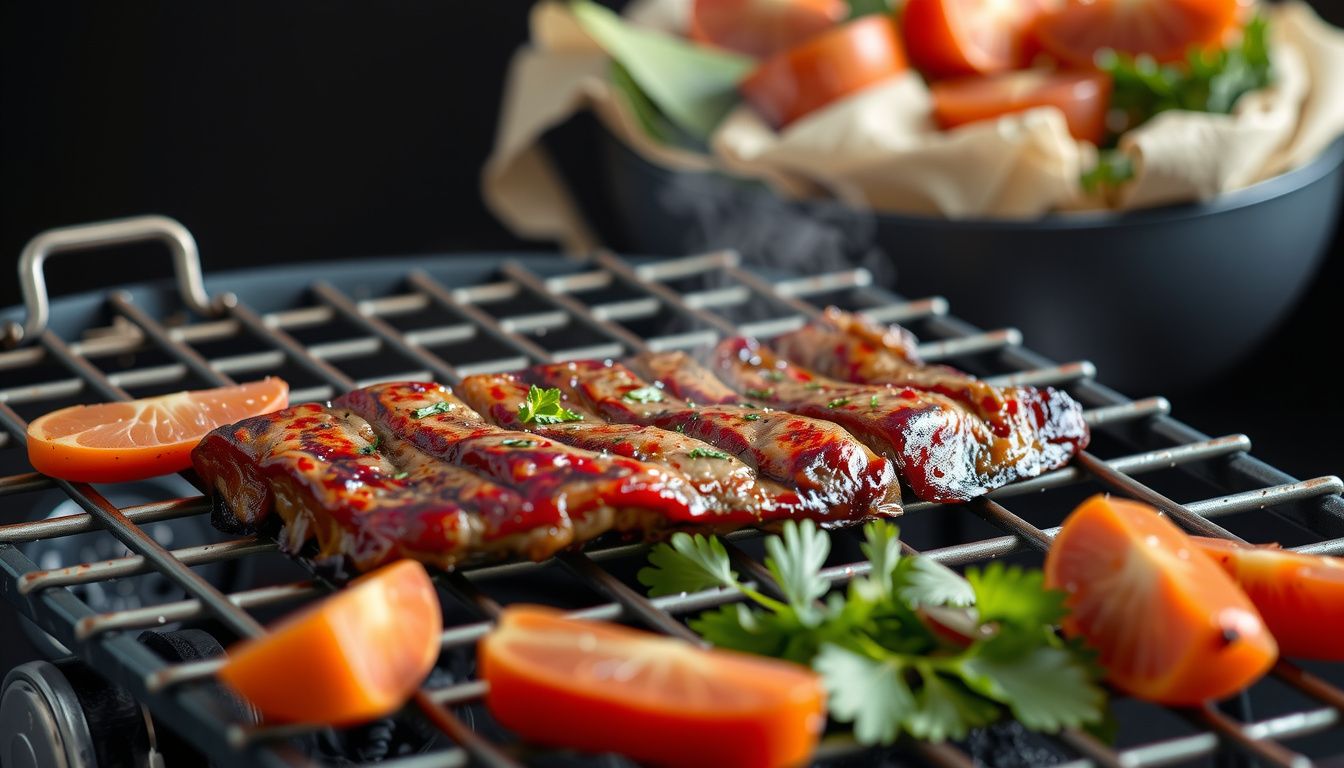
Grill the Ribs Fast Using a Timed Sear-and-Roast Method
With the zones stable, they can use a timed sear-and-roast approach to cook ribs quickly while keeping control. The direct side builds color and bark fast; the indirect side finishes the interior without turning the surface bitter. This is the core technique for how to grill ribs on charcoal fast without gambling on guesswork.
They should start on the hot zone with the lid closed between turns. Closing the lid turns a kettle into a convection oven, speeding cooking and smoothing out hot spots. If flare-ups appear, they should slide the ribs to the indirect side immediately.

-
Sear (8–12 minutes total): Place ribs meat-side down over direct heat for 2–3 minutes, flip, then repeat until color sets. Rotate positions every flip to avoid a single hot spot.
-
Roast (18–30 minutes): Move ribs to indirect heat, bone-side down, close the lid, and hold the grill around 350–425°F.
-
Finish (3–6 minutes): Optional quick glaze over indirect heat, then 30–60 seconds per side over direct heat to tack it up.
They’ll know the ribs are ready when the meat has pulled back slightly from the bone ends and a probe or skewer slides in with light resistance. Fast ribs won’t have the same “fall-off-the-bone” texture as low-and-slow; they’ll be tender with a bit of chew. That’s the trade-off for speed, and it’s normal.
-
Pro tip: Keep the lid on; every peek dumps heat and adds minutes.
-
Pro tip: If the surface darkens too fast, park the ribs on the indirect side and partially close the bottom vent by 25%.
-
Common mistake: Saucing early over direct heat; sugars burn before the ribs finish.
Practical example: If they’re cooking a trimmed rack cut into 3–4 rib sections, they can sear each section 2 minutes per side twice (about 8 minutes), then roast indirectly for 22 minutes at roughly 400°F. A thin glaze goes on for the last 5 minutes, then a 45-second direct-heat kiss sets it before resting.
Finish, Rest, and Slice for Juicy Ribs (Plus Quick Troubleshooting)
Now comes the part that separates “done” from “great.” The final minutes should focus on setting the bark, protecting moisture, and locking in tenderness. A fast cook leaves less margin for error, so they should use simple checks, not guesswork.
First, they should finish with sauce only if they want a glaze. Sugar burns fast over charcoal, so the sauce goes on late and thin. A light brush, then a short return to the cooler zone, builds shine without turning sticky-black.
- Glaze timing: 5–10 minutes before pulling, flipping once.
- Heat placement: Keep ribs on indirect heat while saucing.
- Final set: Move briefly over direct heat only if they’re watching every second.
Next, they should confirm doneness with two quick tests. The rack should bend easily when lifted with tongs, and the surface should show small cracks between bones. If they use a thermometer, they’re looking for tender collagen breakdown, not steak temps.
- Bend test: Rack droops and the bark lightly cracks.
- Toothpick test: Slides between bones with little resistance.
- Temp check (optional): Around 195–203°F in the thickest meat.
Then they should rest the ribs, uncovered, for 10–15 minutes. Resting lets juices redistribute and keeps the crust from steaming. Cutting immediately is a common mistake that drains the meat onto the board.
For slicing, they should flip the rack bone-side up and cut between bones where the gaps are easiest to see. A sharp knife matters. Sawing shreds bark and squeezes juices out.
Practical example: A cook finishes a rack at a backyard cookout, brushes a thin honey-bbq glaze, and parks it indirect for 8 minutes. After a 12-minute rest, they slice bone-side up; each rib stays glossy, doesn’t puddle, and bites clean without falling apart.
If something goes sideways, quick fixes keep the cook on track.
- Outside dark, inside tight: Move fully indirect, close vents slightly, cook 10–15 minutes longer.
- Sauce burning: Wipe off excess, shift indirect, re-glaze thin at the end.
- Dry edges: Rest longer, slice thicker, serve with warm sauce on the side.
You’re Ready
Now it’s clear how to grill ribs on charcoal fast without turning them dry or scorched. The process works because it stays controlled: heat management, timing, and a calm finish. When they treat ribs like a timed cook instead of a slow smoke, the results stay consistent.
Before they lift the lid for the last time, they should run a quick final check:
- Color: deep mahogany, not blackened
- Texture: tender with a clean bite, not falling apart
- Flavor: seasoning balanced, sauce set, no raw sugar taste
Real-world example: if they’re feeding guests in 90 minutes, they can start the fire, cook on schedule, then hold the sliced ribs loosely tented while sides finish—no stress, no cold food.
Next step: they should repeat the method once more this week and log times, vent settings, and rib thickness so the next batch is even faster.